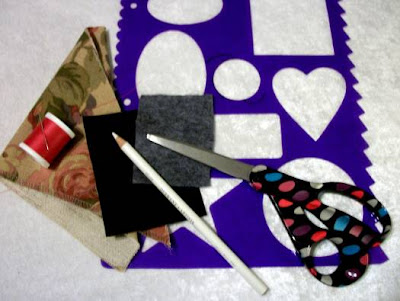
I'm not entirely sure what to call this project - "Fancy Fabric Pendant Thingy" will work for now, I suppose... :)
First, gather your supplies:
You'll need:
A pretty scrap of fabric - almost any kind will work
A small, dark piece of Easy Felt (or other stiffened felt sold in most craft stores)
A small piece of high quality wool (or polyester) felt
A round or oval scrapbook stencil
White colored pencil
A tiny bit of poly-fil
needle and thread
Optional (depending on how you want to dress things up!):
Beads
Sequins
Ribbons
Embroidery floss
Silk Flowers...
... you get the idea!
Start by tracing the stencil outline onto the dark Easy Felt with your white pencil and cut out the felt shape -
Then, using your cut piece as a guide, cut the same shape from the wool felt -
Lay out your fabric and pick a nice spot that will be the front of your pendant. I like to use the leftover Easy Felt as a view finder -
There are a few steps missing here - something was strange with the photos
and they wouldn't upload!!
(*sorry*)
Once you find the perfect section of fabric, lay the original Easy Felt shape on it and trace a line 1/2" to 3/4" from the edge - this depends a lot on the finished size of the piece. The larger the piece, the more fabric you should leave around the edge. You will end up with a circle or (as in the example) an oval that is equally larger on all sides that the original.
We'll be sewing with doubled thread so thread the needle with a comfortable amount of thread and tie a simple knot about 4" from the doubled ends. Begin sewing on the right side of the fabric and do not secure the thread - let the knot do all the work. Sew a simple running stitch about 3/16" or so from the edge -
Sew until you are completely around, making sure the last stitch ends on the right side of the fabric close to the first stitch. Now start pulling the beginning and ending thread ends and the shape will begin to pucker -
Insert the Easy Felt shape and pull the gathers nice and tight around it -
Keeping the thread tension tight, tie a secure knot and clip the threads -
At this point you can go crazy! Decorate the front with beads, sequins, lace, ribbon... anything you can sew or glue down. Decorate to your heart's content! If you want to make your creation into a pendant - now might be the time to add a short loop of ribbon or maybe a metal ring to use as a bail. Don't worry about the knots or stitches on the back since we'll cover those up in a little while.
Once you are done decorating, use a bit of poly-fil to cover the stitching and gathered fabric edges -
Carefully lay the wool felt on the back and sew the edges together using a simple whip stitch (like I did) or something fancier, if you like!
Here are some shots of my finished sample. It's not very fancy because I didn't decorate it but you can see from the pics how it should look -
Here is example of one I made that I did get fancy with! I used some light blue denim fabric for the base and since I am primarily a bead embroidery artist, I decorated it with beads in spring colors and finished it off with a beaded edging and bail.
I hope you will come up with some wonderful uses for you fabric covered base! I would love to see some of your creations so be sure to let me know if you give this tutorial a try :)


Hey Cindy!!
ReplyDeleteThanks for inspiration on how to use those stencils I have left from scrapbooking!! I was just getting ready to get rid of them!!
xx, Carol
BTW, the pendant is great. Very versitile and easy.
Hi Carol!
ReplyDeleteI'm glad you like it! I have had fun making them in different colors and using those pretty scraps of fabric that I just can't seem to part with.
I hope you are getting some of the beautiful weather we are enjoying today -
Cheers,
Cindy
Great idea! This is something that I'd like to try! I am also interested in how to make a beaded bail. What kind of stitch is it?
ReplyDeleteCindy... this is soooooo beautiful.
ReplyDeleteThanks for sharing.
What a lovely tutorial.
Alma
Thank you, Alma! Except for the silly photos that wouldn't do what they were supposed to, I was very happy with it :)
ReplyDeleteI hope lots of people give it a try and send pics of their creations!
Very pretty! I have a teenage daughter that loves wearing large pendants...this will be perfect for her!
ReplyDeleteI hope she will enjoy wearing them! This project is one that can easily be tackled by crafters of almost any age and skill level - a great parent/child project :)
ReplyDeletei love all the tutorials and have not been able to do anything. i've been away taking care of son. but will hopefully get back to doing fun stuff. love the tut, its beautiful.
ReplyDeleteI hope you will find time for some fun and creative stuff SOON! Not to worry, the tutorials will still be there for you when you get back :)
ReplyDeleteThe pendant makes a great jumping off point for so many backgrounds. I can see found objects, cabachons, buttons, etc. Thanks for your tutorial.
ReplyDelete