Starting anew is always a good thing! Here is Vol. 1 of "Artful Living on the Bluff" for you to enjoy. While I am not contributing new material to this blog, please feel free to look around and then visit me at the new and (hopefully) improved "Artful Living on the Bluff" blog at artfullivingonthebluff.blogspot.com

Tuesday, October 16, 2012

Ali's Necklace


A while ago I showed some pics of a necklace I was making for my friend Ali's wedding. I couldn't post final pics because I didn't want the world to see it before the groom did! Happily, the wedding went off without a hitch - what fun it was! - and the bride looked smashing :)

Here are some shots I took of the finished necklace and one of the beautiful bride on the big day - Enjoy! :)


Best finishing job EVER!!

Congratulations Ali and Shane!!

Friday, October 12, 2012

Drills, Saws and Paint... oh. my! :)

At some point in every project you simply need to haul out the big guns - aka. power tools. I love my cordless power drill but have always been a bit frightened of power saws - sharp blades moving back and forth (or rotating) at incredibly high speeds make me shiver a little. But yesterday was the day. The project either sat on my studio table in limbo or I needed to bury my fear and don my safety glasses - thankfully, I chose the latter.

Out came the scroll saw...

...and the Dremel...

...and I set to work getting things cut!!

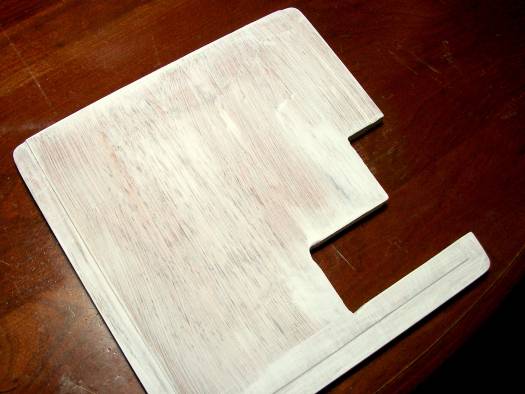
I am using the lid from the wooden cigar box to add another layer to the back of my shadow box. This meant I needed to cut an opening so that the battery compartment and light switch could be easily accessed.
I can't even describe how pleased and relieved I was to have this step finished!! *whew*

After sanding all the cuts and surfaces, I primed...
...and painted...
I needed 4 coats of paint for good coverage - this is after the first coat
Now I'm painting the main box - hopefully the painting will be finished today - Yay!

I can't wait to get on to the assembly!

Monday, October 8, 2012

A New Assemblage Project Underway!

I thought I would share some in-progress shots of my latest foray into assemblage and shadow box art. This one is proving a bit more difficult, mostly because I want to add lighting. Also, I really want to stick to only using found objects and thrift shop treasures in these pieces - no new stuff (except for adhesives and paints - it's hard to find usable glues and paints second-hand!). So...

Materials I'm using so far -
  • A wooden cigar box (garage sale) - The wooden cigar box turned out to be perfect for this project. I bought several at a garage sale, now I realize I should have bought every one they had!! The sides are nice thick wood - mahogany, I think - but the back is made from 1/8" plywood and I am able to cut openings using a utility knife. 
  • Lights from a winter-themed picture (garage sale) - The lights are orange LEDs and have a battery box and a switch. The challenge with these is that I salvaged them from a garage sale find and the wiring was a bit corroded. Not being an electrician and certainly not accustomed to working with such tiny wires, the re-wiring has been a struggle but a great learning experience!
  • Small glass arbor with dried flowers (thrift shop) - This piece had a horrible little corn husk doll inside. She was evicted.
  • Ceramic figurine of Girl (thrift shop) - placed inside the arbor and decorated with some of the acrylic crystals.
  • Silk flowers (thrift shop) - The orange LED lights are inserted into the flowers and the lit flowers were wired into the arbor.
  • Plastic doll face and arms (thrift shop) - Painted a dark metallic bronze and mounted to a section of book board. They will be glued into the corner and then collaged with vintage papers.
  • Glue-on acrylic crystals (thrift shop) - Used for bling where needed!
  • Covers from Reader's Digest condensed books (destash from Mother-in-law) - The book covers are coming in handy to use as walls and dividers where needed. They are really easy to cut with an Exacto knife and the book board is fairly sturdy.
  • Photo from an old magazine (thrift shop) - to back the arbor and hide the lighting wires and such.
So... here are some in-progress shots, not in any particular order but I hope you will enjoy seeing some of the process for this piece. Please be sure to comment! Enjoy :)

The picture the lighting was salvaged from

Monday, September 24, 2012

Finished my first Art Box :)


Thanks to those of you who offered advice on my first attempts at making some shadow box art! I finally finished it - Yay! I really like it and may offer it for sale on Etsy but I think, for the time being, it will live at my house. Anyway, I don't have a name for it yet - if you have any name ideas, let me know :)


Monday, September 17, 2012

Riverssance Art Festival

This past weekend I sold my jewelry at the Riverssance Fine Art Festival in Davenpot, IA. Whew! What a weekend! I had a great time and sent some nice pieces to new homes.

So my days started at 4:45am - I left home each morning to drive to Davenport around 5:45am. I was dreading the drive but the beautiful sunrises changed my mind about that! The morning sky on Saturday was pretty nice...

I got there on Saturday with plenty of time to get ready and was finished with my booth set-up (all by myself, thank you very much!) by 8 minutes past nine (the show started at 10am). Quite pleased with myself for having nearly an hour to spare, I moseyed across the way to talk with another vendor and noticed that my booth looked awful! The way I had set it up made the booth actually appear empty from just across the aisle. I had set everything up along one side wall and if someone was just strolling by, they might not even see my artwork. What luck that I had decided to be sociable that morning!

Anyway, I had time to re-arrange everything and was so happy with the result. I moved the lace backdrop curtains across the back of the booth and set the tables in a shallow "V" so that there was roughly 2 feet of room between the tables and the back wall. I was able to interact with guests from behind my work and hide stuff completely out-of-sight, if needed. Duh. I can't believe I wasn't doing it that way all along! So, here are some shots of the booth AFTER I changed the set-up:

The day went really well - I sold lots, well.... not lots, exactly, but enough to make it a great day in my book! Here's one happy customer wearing her new cuff bracelet - "Brocade".

Sunday started out pretty much the same except the morning sky was even better...
All I can say about this shot is: "Wow! I need to get up early more often!"


Sunday was slower - the second day typically is, IMO - but, again, I made some nice sales and was extremely pleased with the show. I hope they invite me back next year!

*All photos by Cindy Caraway

Monday, September 10, 2012

Going to the Birds!

OK, so some of you may know that I have been thinking a lot about assemblage and mixed media. Not that I don't still love beading but I've really been jonesin' to do something completely different! Finally, today, I decided it was time to go for it and started on my first assemblage art box. I'm not quite Joseph Cornell, but, what the hey...

So I started with an old cigar box and cut the lid off. I decoupaged torn pages from an old dictionary and a Chemical Engineering text book on the inside and around the outside. Next I used some Distressing Ink from Ranger (color: Vintage Photo) and improvised a bit to make it look old and time-worn. Anyway... I sure wish I had stopped to take some in-progress shots if just for my own info!

Then came the fun part of trying to figure out what to put inside! I have finally been using some surfacing treatments I bought years ago (another time when I thought I wanted to do assemblage/altered art! You see, this is a recurring desire...) and painted up a cheapy bird ornament from the thrift store with "Blackened Bronze Metallic" surfacer from Sophisticated Finishes. Again, no before shot, but it turned out pretty nice!

I gathered some white river rocks, shells gleaned from beaches in the Caribbean, twigs from the backyard and a nest (a thrift store find and not a real one... shucks...) and started playing. The twigs were bound together with some tea-stained eyelet lace and found black wire. In front of them is a river rock "cairn". The nest is settled nicely on a beach rock with a white river rock "egg" inside. I didn't like the inside edge of the box showing, so I laid some more twigs along the back and added some shells.

Nothing is permanently attached yet - I may still change my mind about placement and contents but I like it so far. Another thing I'm not sure about is where my little bronze bird should go. I like her perched on top...

...but I also have the idea to have her suspended inside, like she's flying.

If I decide to go with her perched on top, I will definitely need something suspended into the empty space but I have no idea what!

Hmmm.... so what do you think? Let me know - and be nice - this is my first crack at this so don't rain on my parade, OK?

Monday, September 3, 2012

The Dubuque Guitar School

My hubby has just started on a new adventure by creating The Dubuque Guitar School! It's been sort of a whirlwind trying to get everything up and running: building a website, designing print materials, trying to figure out how to advertise... We are, of course, hoping for great success! You can help us by visiting our new website at www.dubuqueguitarschool.com and looking around. Let us know if links don't go where they're supposed to or if you find any of the content confusing - we'd REALLY appreciate it! Thank you, thank you, in advance :)